|
Image Editing
Window Modes |
|
The Image Editing Window is divided into three basic modes: Image Mode,
Mask Mode, and Preview Mode. Using the tabs at the bottom of the window,
it is possible to switch between these modes and examine and modify every
aspect of an image or animation sequence. |
Image Mode
|
Image Mode is used to edit a sprite's primary image. The above screenshot
demonstrates a sprite viewed through Image Mode. Image Mode supports
nearly all of the tools and editing features described in the sections that
follow. |
Mask Mode
|
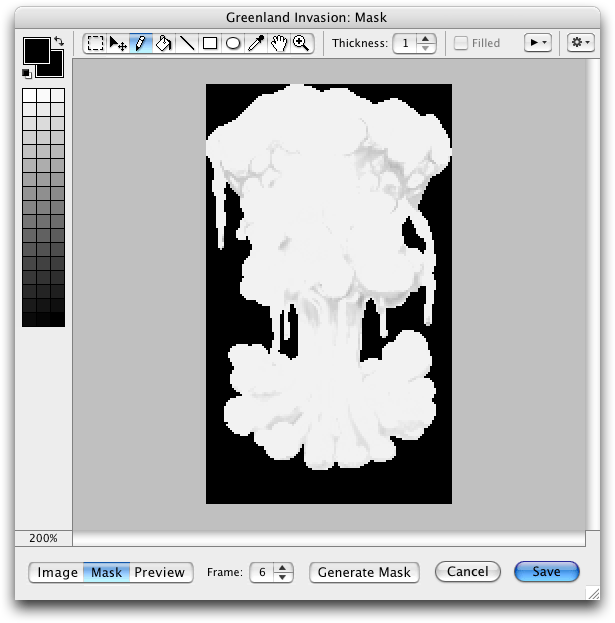
Mask Mode is used to edit the grayscale opacity mask that determines
the level of semi-transparency assigned to each pixel in an image. This is
described in greater detail below, in the Mask Editing section. |
Preview Mode
|
Once an image and its mask have been painted, it may be useful to preview
the composited result. The Preview Tab, located at the bottom of the Image
Editing Window, displays the masked image against a customizable backdrop,
making it possible to see the mask's effect on the opacity of each pixel
in the image.
When the Image Editing Window is set to Preview Mode, all painting controls and
image manipulation options become temporarily disabled. Switching back to Image
Mode or Mask Mode re-enables these features. |
|
Animation
Controls |
|
If the image being edited belongs to a multi-frame animation sequence, the
Frame and Onion Skin Menus are enabled. These controls are located at
the bottom of the Image Editing Window, to the right of the Mode tabs.
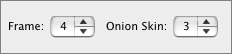
The Frame Menu is used to select a frame to edit from within the
animation sequence. The small up and down arrow buttons on the right side
of the menu are
used to step forwards and backwards through the sequence.
The Onion Skin Menu makes it possible to overlay the current animation
frame on top of another frame. When drawing
a frame, animators often use onion skinning to trace over the previous frame
of an animation, making minor changes from one drawing to the next. The
Onion Skin Menu allows
any frame from a sequence to be made visible under the
current frame. If "No Onion Skinning" is selected from the menu, only the
current frame will appear, and the Onion Skin Menu will be labeled with
a "-" symbol. The Onion Skin Menu is only available when Image
Mode is active.
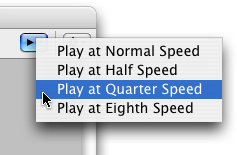
The Animation Menu, which is located near the upper right corner of the
Image Editing Window and labeled with a triangular Play icon, is used to
preview animation sequences. It may be used from within Image Mode, Mask
Mode, or Preview Mode, but like the Frame and Onion Skin menus, it is only
enabled if the image that being edited belongs to a multi-frame animation
sequence. Clicking on the Animation Menu brings up four playback options,
as shown below. Animation sequences may be played at their native, "normal" speed,
or any of three slower speeds. Once it is playing, an animation sequence
will loop indefinitely until the mouse is clicked or the Escape key is pressed.
 |
|
The Color Palette |
|
The customizable color palette that appears on the left side of the Image
Editing Window comes preset with a wide variety of color hues and
values. Clicking on a color sets it as the foreground color, allowing
it to be applied to the image using the painting tools. Double-clicking
on a color in the palette brings up the Color Picker, which is used to
customize the palette. Note
that although the Color Palette is available from within both the Image
and Mask Modes, it is reduced to a grayscale, non-editable palette
in Mask Mode.
At the top of the Color Palette is a set of controls pertaining to the
currently selected foreground and background colors, as shown below. |
 |
Foreground Color Swatch
|
The Foreground Color Swatch represents
the color that is drawn onto the image when the Pencil, Paint Bucket, Line,
Rectangle, or Oval tools are used. To change the foreground color, click
the Foreground Color Swatch or select one of the colors in the Color Palette. |
Reset Colors Icon
|
Click the Reset Colors icon to set the foreground color
to black and the background color to white. |
Swap Colors Icon
|
Click the Swap Colors icon to switch the foreground color with the
background color. |
Background Color Swatch
|
The Background Color Swatch represents the color that is drawn
when a portion of the image is deleted. |
|
Image Editing Tools |
|
The Image Editing Window includes ten tools for painting, image
manipulation, and navigation. They are described below, in the order in
which they appear on the tool palette. |
|
 |
Marquee Tool
|
The Marquee Tool is used to create rectangular selections. Once
a portion of the image has been selected, it can be moved by dragging
the mouse, or cut, copied, or cleared via the commands in the Edit Menu.
Press M to switch to the Marquee Tool. |
Move Tool
|
The Move Tool is used to move the portion of the image that
has been selected with the Marquee Tool. If no selection has been made,
the Move Tool moves the entire image. When a portion of the image has
been moved, the current background color fills the space left behind.
Press V to switch to the Move Tool. |
Pencil Tool
|
The Pencil Tool is used to draw the current foreground color
onto the image. The Thickness control at the top of the Image Editing
Window may be used to set the weight of the mark drawn by the pencil.
To draw perfectly horizontal or vertical lines with the Pencil Tool, hold
the Shift key while dragging. Press B to switch to the Pencil Tool. |
Paint Bucket Tool
|
The Paint Bucket Tool is used to fill areas with the current
foreground color.
Press G to switch to the Paint Bucket Tool. |
Line Tool
|
The Line Tool is used to draw straight lines using the current
foreground color.
The Thickness control at the top of the Image Editing
Window may be used to set the weight of the line. To lock the line
into 45 degree increments, hold the Shift key while dragging. Press L
to switch to the Line Tool. |
Rectangle Tool
|
The Rectangle Tool is used to draw filled or unfilled rectangles,
depending on the state of the Filled Checkbox at the top of the Image
Editing Window. If the rectangle is unfilled, the Thickness control at
the top of the Image Editing Window may be used to set the weight of
the rectangle's lines. To create a square instead of a freeform rectangle,
hold the Shift key while dragging. Press R to switch to the Rectangle
Tool. |
Oval Tool
|
The Oval Tool is used to draw filled or unfilled ovals,
depending on the state of the Filled Checkbox at the top of the Image
Editing Window. If the oval is unfilled, the Thickness control at
the top of the Image Editing Window may be used to set the weight of
the line used to draw the oval. To create a circle instead of a freeform
oval, hold the Shift key while dragging. Press O to switch to the
Oval Tool. |
Eyedropper Tool
|
The Eyedropper Tool is used to sample a color from the image.
This sets the foreground color to the sample. Hold Option to temporarily
switch to the Oval Tool while another tool is in use. If the Option key
is pressed when sampling a color, the sample is assigned to the background
color instead of the foreground color. Press I to switch to the
Eyedropper Tool. |
Hand Tool
|
The Hand Tool serves as an alternative to the scroll bars to
navigate through the image. Hold the Space Bar to temporarily switch to
the Hand Tool while another tool is in use. Press H to switch to the Hand
Tool. |
Zoom Tool
|
The Zoom Tool is used to magnify the image.
With the Zoom Tool selected, clicking on the image causes it to double
in size, up to a maximum scale of 1600%. Hold the Option key while clicking
to zoom out. Press Z to switch to the Hand Tool. It is possible to zoom
in or out even if the Zoom Tool is not selected; just Press Command +
or Command -, or select a magnification value from the zoom pop-up menu
located under the Color Palette. |
|
Image Manipulation Controls |
|
The "Gear" Menu at the top right corner of the Image
Editing Window provides access to several image manipulation controls,
which may be used to perform operations such as scaling, cropping, and
flipping, as described below. Note that not every image manipulation command
can be applied to certain images. For example, it is impossible to change
the canvas size of a background tile image, because it must remain 64
by 64 pixels in size. |
Adjust Brightness...
|
The Adjust Brightness command brings up the Brightness Dialog,
which allows the image to be lightened or darkened. If the slider is
dragged all the way to the left, the image becomes completely black; dragging
the slider all the way to the right makes it completely white. Alternatively,
a percentage value between 0 and 100 may be entered into the Brightness
field. Click OK to confirm the operation and return to the Image Editing
Window. |
|
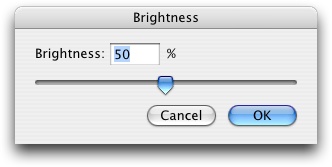 |
Image Size...
|
This command displays the Image Size Dialog,
which allows an image to be resampled (as opposed to being expanded or
cropped, as with the Canvas Size operation.) The Image Size dialog reveals
the image's current and potential dimensions, as shown below. Enter new
Width and Height values into the fields provided, and click OK to complete
the operation. If the Constrain Proportions checkbox is checked, the image
is scaled uniformly, minimizing distortion. |
 |
Canvas Size...
|
This command displays the Canvas Size dialog, which allows a
picture to be expanded or contracted without being resampled (as opposed
to the Image Size command, which involves resampling.) The top of the
Canvas Size Dialog reveals the image's current size, and the bottom provides
fields into which new Width and Height values may be entered. The Anchor
control is used to determine which portion of the image remains fixed
as the canvas grows or shrinks. If the canvas is to be enlarged, any new
pixels added to the perimeter of the image will be set to the current
background color. After entering new values and selecting the position
of the Anchor, click OK to complete the operation. |
 |
Crop
|
The Crop command reduces the size of the image to the currently
selected area. This command only has any effect if the Marquee Tool has
been used to select a portion of the image. |
Rotate Canvas 180 Degrees
|
The Rotate Canvas 180 Degrees command rotates the image by a
half-turn, preserving the aspect ratio of the image. |
Rotate Canvas 90 Degrees CW
|
The Rotate Canvas 90 Degrees CW command rotates the image clockwise
by a quarter-turn. |
Rotate Canvas 90 Degrees CCW
|
The Rotate Canvas 90 Degrees CCW command rotates the image counterclockwise
by a quarter-turn. |
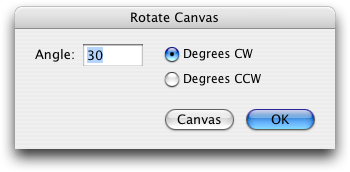
Rotate Canvas Arbitrary...
|
The Rotate Canvas Arbitrary command rotates the image by the amount
specified in the Rotate Canvas dialog box, shown below. The value entered
in the Angle field determines the amount of rotation, and the Degrees radio
buttons determine the direction of rotation. Click the OK button the complete
the operation and return to the Image Editing Window. |
|
 |
Flip Canvas Horizontal
|
The Flip Canvas Horizontal command flips the image horizontally.
It is mirrored along the Y axis. |
Flip Canvas Vertical
|
The Flip Canvas Vertical command flips the image vertically.
It is mirrored along the X axis. |
Reset Color Palette...
|
The Reset Color palette command removes any customizations that
have been made to the color palette, restoring its default settings. This
operation is not undoable. |
|
Multiple Undos
and Fading |
|
Unlike other windows in Power Game Factory, the Image Editing Window
supports multiple levels of undo. The Undo and Redo commands may be used
to navigate to any place in the history of an image. In addition, it is
possible to fade between history states. After a paint operation has been
completed, the Fade... command becomes available in the Edit Menu. Selecting
this option displays the Fade Dialog, as shown below.

The degree of fading may be controlled by entering a value between 0 and
100 in the Opacity field, or by dragging the slider to the desired position.
Higher values fade the image closer to its most recent history state, while
lower values fade it towards its previous history state. |
|
Mask Editing |
|
Most sprite graphics in a Power Game Factory game are comprised
of both an image and a mask. Masks are used to determine the opacity of
each pixel in a sprite, with white representing complete opacity and black
representing full transparency. |
Using Mask Mode
|
To edit an image's mask, click the Mask tab near the bottom left
corner of the Image Editing Window. A black and white silhouette of the
image will appear, and the color palette will be replaced with a non-editable
collection of grayscale swatches. The same tools and image manipulation
options that are available in Image Mode can be used in Mask Mode, but the
Color Palette will be reduced to a limited selection of monochromatic swatches.
Note that certain images are always fully opaque. These include Interface
graphics and background tiles. When such graphics are edited, Mask
Mode is disabled.
When the Image Editing Window is set to Mask Mode, the Generate Mask button
becomes enabled.
This button may
be used to quickly create a simple mask for the associated image. Any white
pixels in the image are completely masked out, and all non-white pixels
are assigned full opacity. Note that these automatically generated
masks lack the subtle opacity gradations that can be created when painting
masks by hand. |